Friday, July 9, 2010

Shapefile to Geodatabase(Feature Class)

Follow the below steps:


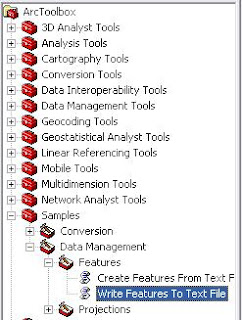
1.In ArcToolbox, Goto Conversion Tools.

2. Explode it and then explode To Geodatabase.

3. Double Click on Feature Class to Feature Class.

4. Specify the input Feature(Shapefile).

5. Then Specify the output location of the new Feature Class. (The Location should be a Geodatabase).

6. Specify the name for Output Feature Class.

7. Click Ok and now the Feature Class has been created.

Another Method for Batch Conversion:

For batch conversion of several features (Shapefiles), Select the To Geodatabase (multiple) Tool. This is found below the previous tool.

Feature or Shapefile to Text File

Follow the steps given below to Convert the Shapefile or Feature to Text File:


1. Open ArcMap and Goto ArcToolBox. 

2. Goto Samples Toolbox.

3. Explode  Data Management and then Features.

4. Now Double Click on the Write Features to Text.

5. Specify the input feature or Shapefile and then specify the Output Text file location & Name.

6. Don't forget to specify Decimal Seperator Character.

7. Click Ok. Now the Feature or Shapefile has been converted to Text.

XY Table to Feature

This is a simple workaround. Follow these steps to create feature from xy table:


1. Open Arc Catalog.

2. In Catalog Tree, just browse your table(can be a .csv, .dbf, etc.)

3. Right Click on the Table and Select Create Feature Class.

4. Then Select From XY Table.

5. Give appropriate X and Y Fields and specify the output location and name for the new feature.

6. Now the features has been created.

Another Method:


1. Open ArcMap.

2. Go to Tools in Menubar and then select Add XY Data.

3. Now specify the Table having data and also specify the appropriate X and Y fields.

4. Click Ok. Now the feature has been created.

Another Method:


1. Open ArcMap and Goto ArcToolBox.

2. Then explode the Data Management Tools.

3. In Data Management Tools Explode Layers and Table Views.

4. Double Click on Make XY Event Layer.

5. Specify the table and appropriate X and Y Fields.

6. Specify Layer Name and then Click Ok.

7. Now the Layer has been Created.

Viewing LAS (LiDAR) File in ArcGIS

LAS Reader for ArcGIS 9

GeoCue LAS Reader for ArcGIS 9 utility very useful for working with LiDAR data.

This FREE utility adds LAS Version 1.0 File read capability to the ArcGIS 9 family of products utilizing ArcCatalog. Point x, y, z and classification values are read from the file and presented as a standard 3-D point data layer which can then be used as input to extensions such as 3-D Analyst.

Link to LAS Reader for ArcGIS 9:

http://www.geocue.com/utilities/exe/lasreader.exe

Installation Instructions:

http://www.geocue.com/utilities/lasreader_instructions.pdf